
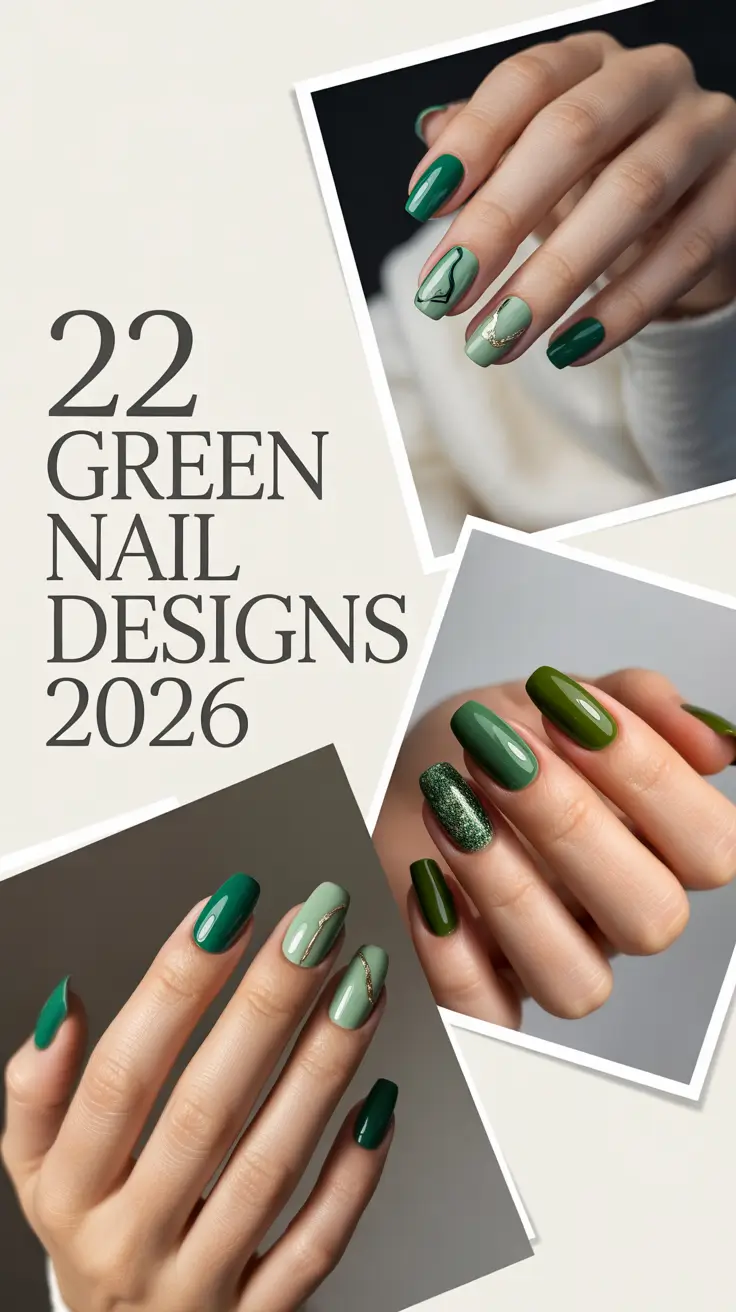
Warm weather always makes me want to switch things up – you too? There’s something about the first sunny days that practically begs for a new manicure. And this year, all signs point to green taking over every shape, shade, and vibe imaginable. But what kind of green feels right for you in 2026 – soft Pastel, bold Neon, deep Forest, or something delightfully Funky? And how do you take a color that seems so specific and turn it into everyday Inspo?
That’s exactly what I’m diving into here. Each look brings its own energy, its own seasonality, its own tiny story. If you’ve been craving fresh Ideas for green nails designs, want something wearable yet eye-catching, or you’re simply in the mood to try something new, you’re in the right place.
Let’s walk through these Designs together – from breezy Mint accents to moody emerald moments – and maybe one of them will become your next signature summer look.
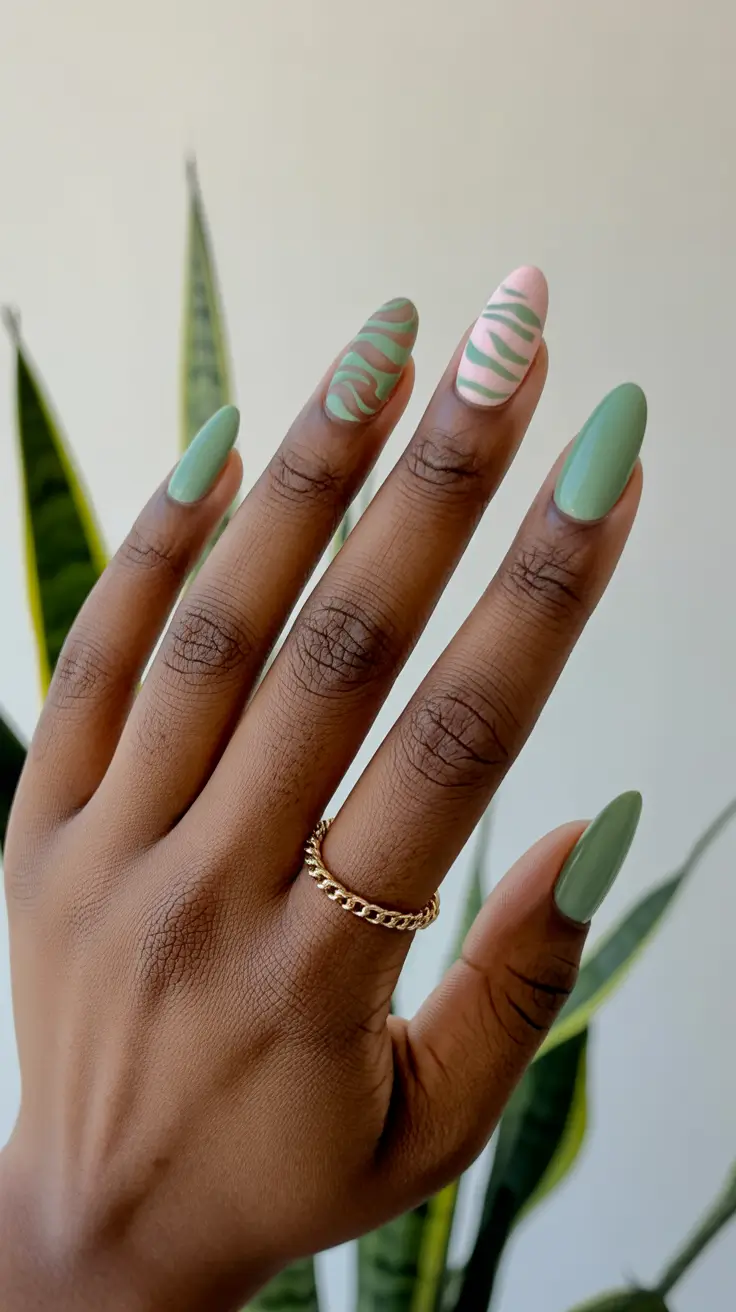
Soft Mint Waves for Lighthearted Summer Days
The first look feels like a quiet exhale – smooth Mint lacquer with flowing darker green lines that almost drift across each nail. I love how balanced this feels: not too graphic, not too minimal, just the right amount of soft movement. It’s perfect if you’re craving something Simple, Cute, and still creative without being overly detailed. This style works especially well for green nails short, green nails simple, and for anyone who loves a breezy green nails aesthetic.

To build this look, I usually reach for a milky Light green polish like Essie’s “Mint Candy Apple” as a base, then add a thin liner polish in a darker shade – something close to Olive or soft Sage is ideal. A glossy topcoat pulls everything together. The key is contrast that still feels airy.
When creating designs like this at home, I tend to steady my non-dominant hand by resting my elbow on the table. Celebrity nail artist Betina Goldstein often mentions that relaxed pressure is the secret to smooth line work – and she’s absolutely right. I trace the curves slowly so the lines feel organic, not forced.
Honestly, this is one of those manicures I reach for when I want to feel put together without trying too hard. It’s easygoing, versatile, and has just enough Art energy to spark compliments from strangers at the coffee shop. A little calm moment on your fingertips.
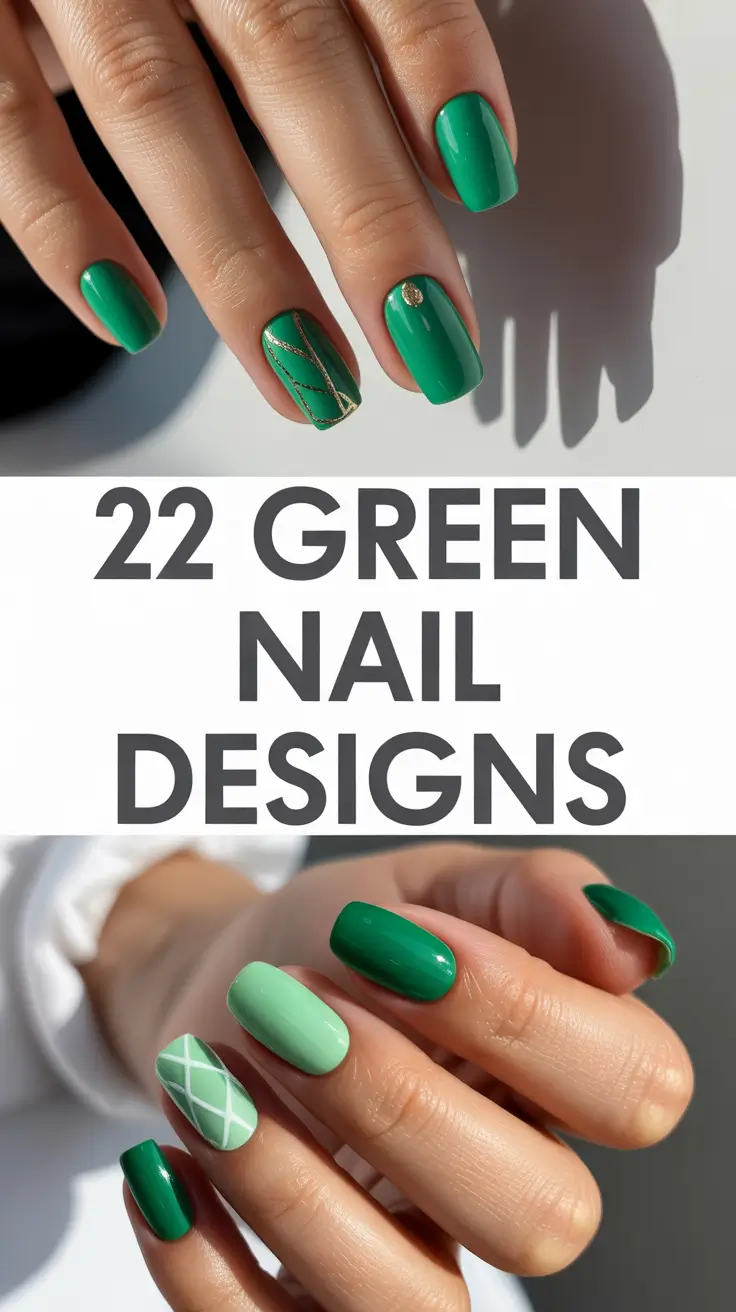
Lime Speckles With Graphic Contrast
Here’s a bolder take – vivid Lime green with delicate speckling, paired with a crisp accent featuring a Black and leafy motif. The contrast between playful dots and structured botanical shapes makes the whole manicure feel modern and sharp. It’s the kind of thing I’d wear in peak green nails summer when I want my nails to look unexpectedly fresh but still wearable. Perfect if you love green nails with design and want something bright without going full Neon.

For this design, I usually combine a neon-lime gel like OPI “The Lime Starts Here” with a white gel base for the accent nail. The speckles can be done with a tiny dotting tool dipped into black gel. For the leaf, a fine detailing brush helps keep the lines crisp. A high-shine topcoat gives it that candy-like finish.
This kind of look is surprisingly easy to recreate at home. I start with the full lime coat, cure it, tap on the speckles, then finish with the accent nail last so I can take my time with the detailing. Many pros recommend working in thin layers when using bright colors – especially neon-adjacent tones – so the finish stays smooth instead of thick.
It reminds me of the days when my friend Mia and I would try to outdo one another with summer nail Inspo. She always leaned into bolder tones, and designs like this would totally be her pick. If you want energy on your fingertips, this is it.
Pastel Almond Glam With Dewdrop Details
If soft glam had a color palette, this would be it – gentle pink, creamy white, and a soothing green forming a cohesive Pastel almond set. I love how the subtle gradient and bead-like dewdrop embellishments add dimension without feeling heavy. It’s elegant yet playful, dreamy but not too precious. A gorgeous option for green nails acrylic, green nails almond, or anyone who loves a fresh blend of Pink and green.

For these blends, I like using sheer gel polishes such as The GelBottle’s Baby Pink and a muted mint. The raised droplets can be made with clear builder gel for that dimensional look. It’s one of those techniques that looks complicated but isn’t once you try it.
To get this result at home, you want your layers to be whisper-thin. Nail educator Julie Kandalec often talks about how sheer colors work best when layered gradually, almost like watercolor. After applying the colors, I dab small touches of builder gel using a dotting tool, cure them, and seal everything with a glossy topcoat.
This style always makes me think of early summer mornings – cool air, soft light, that sense of anticipation. Whenever I wear a manicure like this, I instantly feel a little more polished, like the day might hold something lovely.
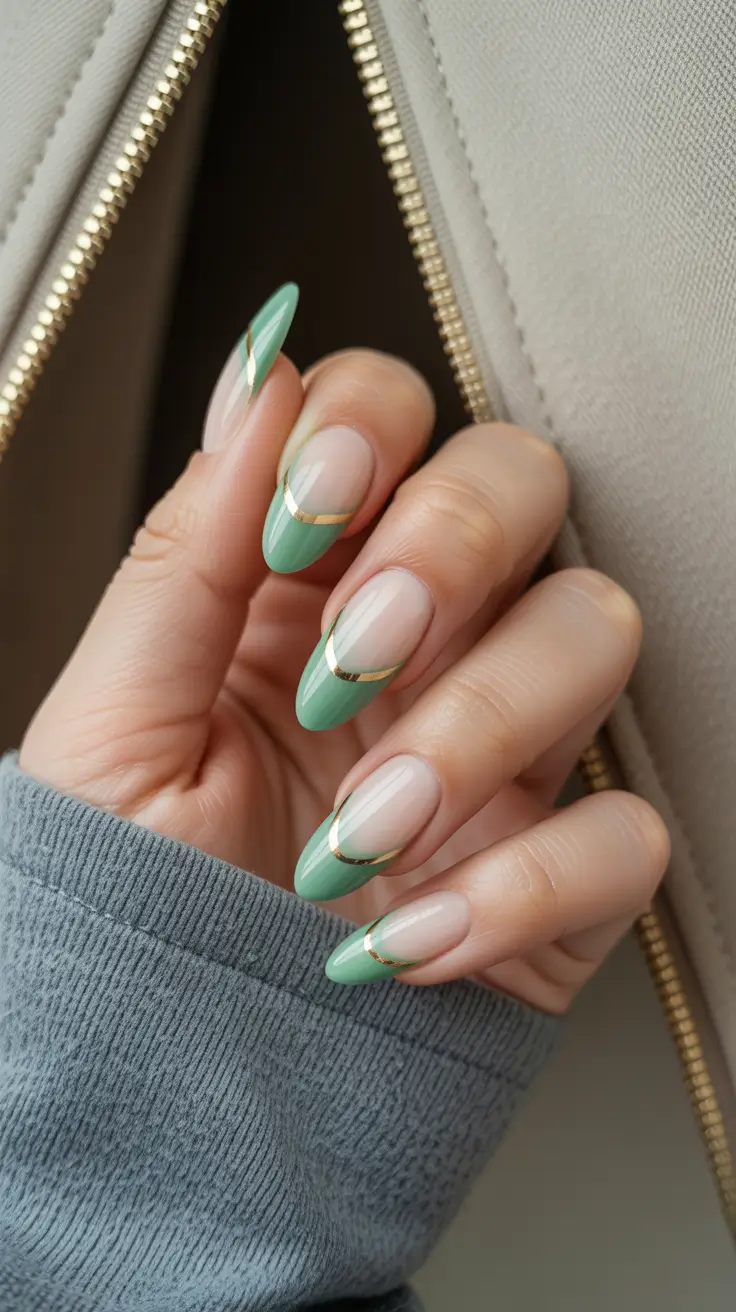
Mint French Accents With Golden Edges
This look feels chic in a very effortless way: a nude-pink base paired with asymmetrical Mint tips edged in delicate metallic gold. It’s a modern twist on a green nails french tip – still classy, but with just enough edge to feel current. I love how this works for occasions when you want something refined but not predictable.
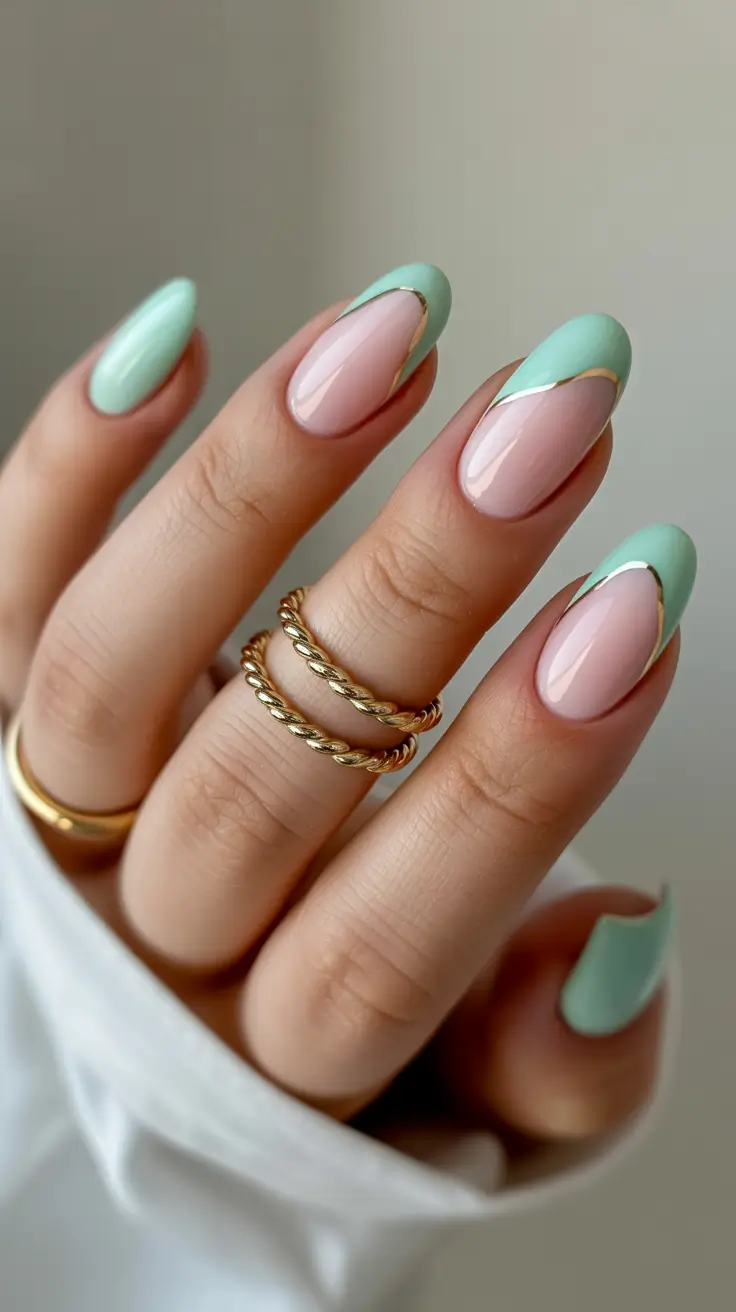
For the materials, I reach for a natural-base gel (something like OPI’s Bubble Bath), a soft mint gel, and a gold striping polish or metallic foil. Precision is key, but the asymmetry keeps things relaxed rather than rigid.
This is one of those manicures that’s surprisingly friendly for beginners. I usually outline the mint shape first, fill it in, cure it, then add the gold detail along the edge with a fine liner. Many celebrity manicurists recommend using the brush almost sideways for metallic lines – it allows for smoother movement.
Whenever I wear a design like this, I feel like I’m channeling a quiet luxury aesthetic. It’s a perfect blend of minimalism and shine – a little unexpected twist that still goes with everything in my wardrobe.
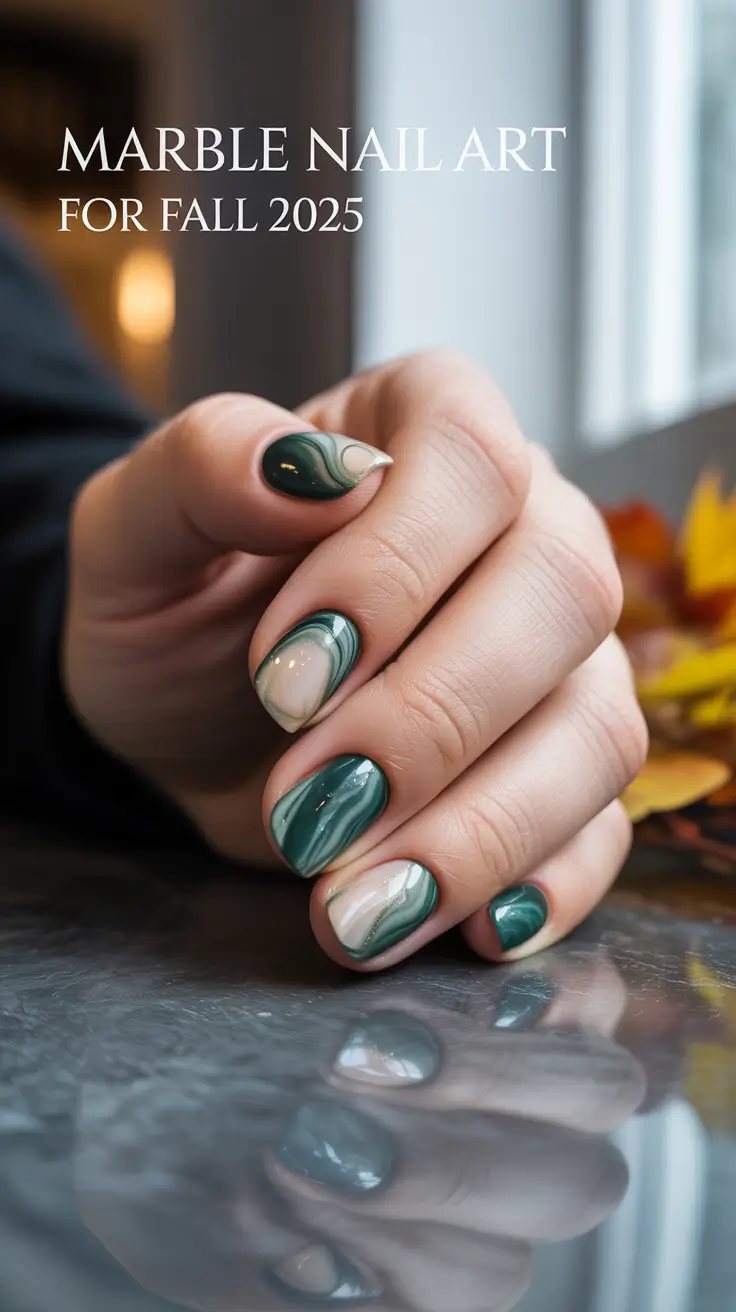
Deep Emerald Elegance With Marble Accents
This final set leans into rich, moody beauty – glossy deep Emerald paired with soft marble details that bring a fluid, luxurious feel. It’s bold yet sophisticated, ideal for nights out, transitional seasons, or whenever you want to bring a touch of mystery to your look. It fits beautifully within green nails designs, green nails inspiration, and even Dark or Forest tones for those who love deeper palettes.
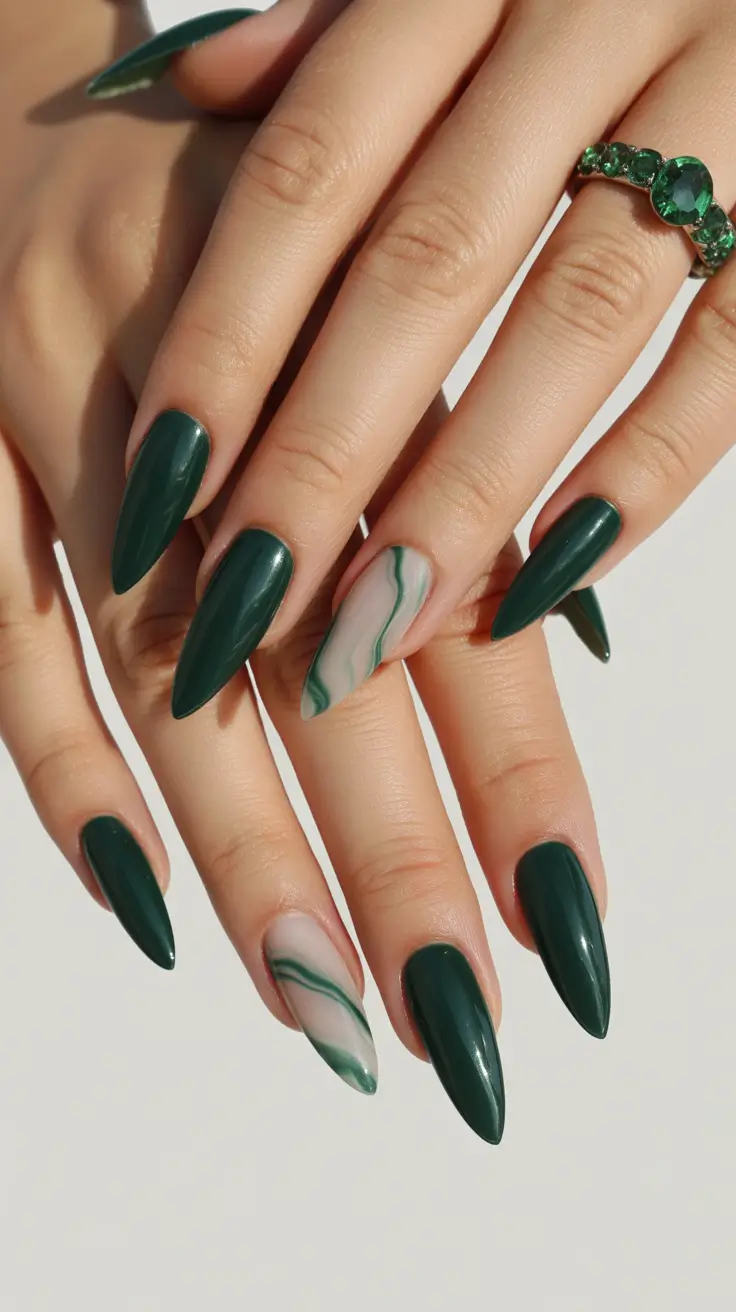
To recreate this, I gravitate toward saturated gel colors like Gelish’s “From Rodeo to Rodeo Drive” or any deep emerald gel. For the marble effect, a milky nude paired with thinned-out lines of dark green does the trick. A glossy finish really makes the dark shade glow.
Marbling is easier than it looks. I apply the base shade, then drag diluted green pigment gently through the nude layer before curing. Many pros suggest using a liner brush dipped in isopropyl alcohol to soften harsh lines – it’s one of my favorite tricks.
There’s something powerful about wearing a deep emerald manicure. It makes me feel grounded, stylish, and slightly dramatic in the best way. If you’ve been craving a darker moment that still feels elevated, this is such a good place to start.
Classic Medium Green for Everyday Confidence
There’s something so grounding about a clean medium-green manicure. The shade sits right between bold and understated, which makes it incredibly wearable for everyday life. I love how this look leans into pure color – no accents, no distractions, just glossy green that feels intentional and modern. It’s perfect for anyone who loves green nails ideas that stay chic without extra Art. And if you prefer a slightly elevated Simple vibe or want a break from neutrals, this is such a refreshing shift.

A rich crème polish works best here – something close to OPI’s “My Studio Green” or Zoya’s “Everly.” I personally prefer gel formulas because they help maintain that glassy shine for weeks. If you enjoy green nails acrylic, this shade layers beautifully on sculpted shapes too. A good base coat and an extra-thick glossy topcoat really enhance the depth of the color.
Whenever I do single-shade manicures, I follow a tip I once read from Orly’s creative director: float the brush slightly during the final layer instead of pressing down. It creates that ultra-smooth finish you normally only see in salons. The effect is subtle but so satisfying.
This is one of those manicures I go back to when I need grounding. It’s familiar, polished, and strong without shouting. A tiny reset button wrapped in green.
Sage and Pastel Stripes With Soft Pink Accents
This set blends soft Sage, dusty Pastel green, and a gentle Pink and base into a zebra-inspired pattern that feels surprisingly tranquil. The combination is playful but not loud, making it a great choice for anyone who loves unique Designs that stay approachable. The matte finish softens everything further, giving the stripes a dreamy depth. If you’ve been craving green nails aesthetic with a twist, this is a gorgeous direction.
Creating a manicure like this usually requires two green tones: one soft matte sage and one slightly lighter pastel mint. The striping brush is your best friend here. I like applying the nude-pink base first on the accent nails, then layering the stripes with slow, controlled strokes. A velvet matte topcoat seals the look.
One thing I learned from celebrity nail tech Sonya Belakhlef is to work with extremely thin polish when doing stripes. It prevents uneven texture and helps every line dry smoothly. I use that advice every time I try detailed patterns – it truly makes the process easier.
These nails remind me of soft summer mornings when everything feels unhurried. It’s a little artistic moment I can wear through the week without feeling overdressed.
Lime Shine With Crystal Accents
This design captures that bright, juicy Lime energy that always hits hardest in early summer. Paired with a nude base and tiny crystal embellishments, the result feels both playful and surprisingly refined. It’s perfect if you love green nails with design that bring sparkle without going full glam. These shapes also pair beautifully with green nails almond, giving the whole look a slender, runway-inspired silhouette.

When creating this look, I like using a bright gel such as The GelBottle’s “Limeade” and a natural-beige sheer for contrast. The crystals can be added with a dot of builder gel or rhinestone glue so they stay secure for weeks. The diagonal tip streak on the nude nails adds an airy lift to the composition.
A technique that helps here is applying the crystals before the final topcoat – then sealing around them, not over them. Many pros say this prevents dullness and keeps their shape crisp. I learned this trick from an old masterclass and still use it religiously.
This manicure always gives me that “fun weekend ahead” feeling. It’s upbeat without being chaotic – a tiny celebration right on your fingertips.
Neon Light Green With a Bold Sculpted Shape
If summer had a signature nail, this might be it. The bright Neon green radiates energy, making every movement of your hands feel intentional and expressive. Paired with a long, sculpted square silhouette, the whole look leans into confident drama. It’s the kind of style that fits perfectly into green nails summer and easily sparks compliments from strangers. For those exploring green nails acrylic or green nails ideas that make a statement, this shade is irresistible.
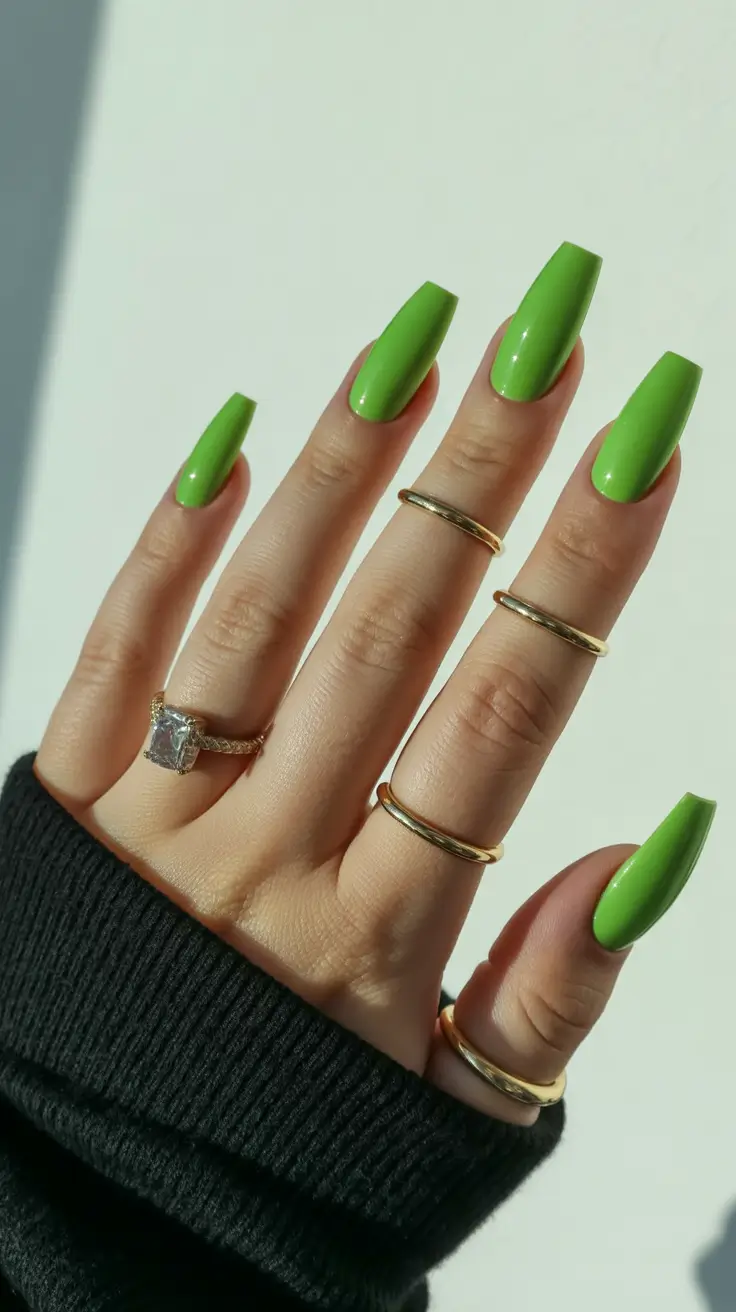
I usually go for gel polishes specifically labeled neon to get this intensity, such as “Glowstick” by Lights Lacquer. Sculpted nails benefit from thicker formulas that self-level nicely. A glossy topcoat enhances the radiance, especially under sunlight.
Neon shades can be tricky, and a great tip from Allure’s editorial features is to start with a white base coat to amplify brightness. It makes the color pop instantly. I find this especially helpful with longer nails, where vivid shades need extra support to stay opaque.
This look always feels like saying yes to summer. Yes to spontaneity, to brightness, to letting your nails speak first. When I wear colors like this, I feel unstoppable.
Olive Soft Glam With Subtle Wild Accents
This manicure blends elegant Olive tones with a soft Pink and neutral base and a playful leopard accent. It’s chic without trying too hard, the kind of design that fits perfectly into transitional months when you want subtle color but also a touch of personality. The warm sunlight enhances the glossy finish, giving everything a glow that feels almost luxurious. If you’re into green nails designs with a gentle Funky edge, this one feels just right.
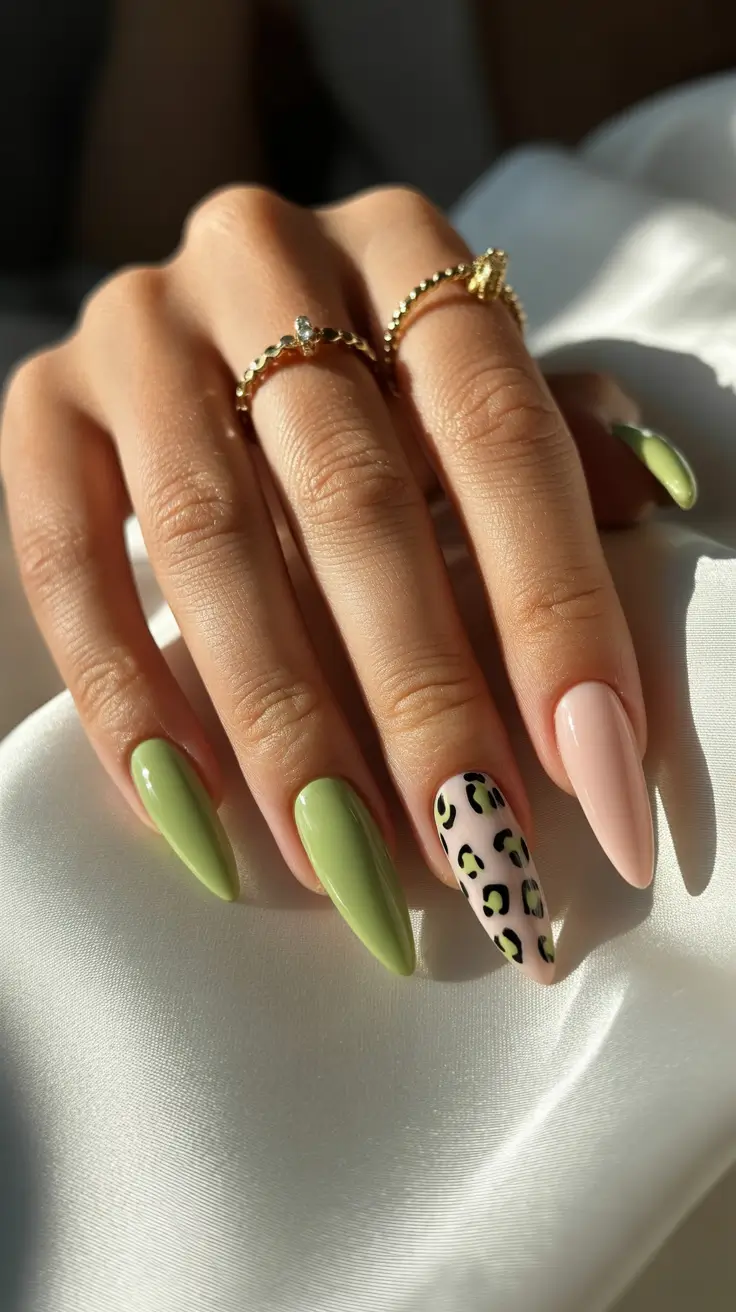
The materials are simple but thoughtful: a muted olive gel, a soft pink nude, and black-and-olive spots for the leopard. I usually achieve the spots with a dotting tool, creating imperfect shapes so the pattern looks more natural. A glossy topcoat ties everything together.
Patterns like this are surprisingly forgiving. A tip I picked up from a session with a nail educator at Olive & June: irregularity makes animal prints more chic. When everything looks intentionally loose, the result is softer and more wearable.
Every time I wear this style, I’m reminded that playful details don’t have to be loud. Sometimes a little wildness on one nail is exactly enough to make the whole set feel personal.
Mint-Tipped French Arcs With Golden Edges
This look feels like a breath of early summer – soft Mint tips shaped into gentle arcs, edged with thin metallic gold. What I love most is how the nude base keeps everything airy while the green brings just enough color to feel intentional. It’s a polished take on green nails french tip, but with a lighter, more graceful mood. The gold edging lifts the whole design, almost like jewelry for your fingertips.
For a manicure like this, I reach for a sheer beige base, a pastel Light green gel, and a metallic liner polish. Sculpted almond shapes really show off the curve of the French arc. The gold line should be thin enough to look delicate but still visible enough to catch sunlight.
I usually create this design by outlining the mint arc first, filling it in, curing, and then finishing with the gold stripe. A tip I learned from a manicurist at Paintbox NYC: use your breathing rhythm to steady your hand when lining metallic accents. It sounds strange, but it helps keep lines ultra smooth.
This style always makes me feel quietly elegant – a little soft, a little polished, and completely ready for warm-weather plans.

Muted Green and Grey Minimalism
There’s a calm beauty in this set – alternating muted sage, dove grey, and deep graphite tones. It feels subtle, modern, and thoughtfully balanced, the kind of look that fits beautifully into fall or early spring. For anyone who loves green nails simple or wants something chic without extra Art, this minimalist palette is a perfect choice. It’s both earthy and contemporary, almost Scandinavian in its restraint.

When creating a look like this, I prefer crème polishes with a smooth, self-leveling texture. A dusty sage, a charcoal grey, and a soft stone grey create this kind of visual rhythm effortlessly. Short and medium lengths work especially well here – ideal for green nails short lovers who still want something chic.
This is one of those manicures I can do almost mindlessly at home because it’s all about even application. No detailing, no tools – just clean coats of color. I often remember a quote from Deborah Lippmann about how “neutral tones can express confidence more quietly than brights,” and this palette captures exactly that.
I love wearing nails like this when life feels busy. They go with everything, they look modern, and they bring a bit of grounded calm to the week.
Pastel Daisy Fields for Soft Spring Energy
This one feels like stepping into sunshine. A soft Pastel green base dotted with cheerful hand-painted daisies – bright white petals, warm yellow centers, and an irresistibly uplifting vibe. It’s sweet without being overly Cute, making it an ideal choice for spring weekends or anytime you want a soft pop of floral charm. If you like green nails aesthetic that leans feminine without going full romantic, this daisy moment is so joyful.
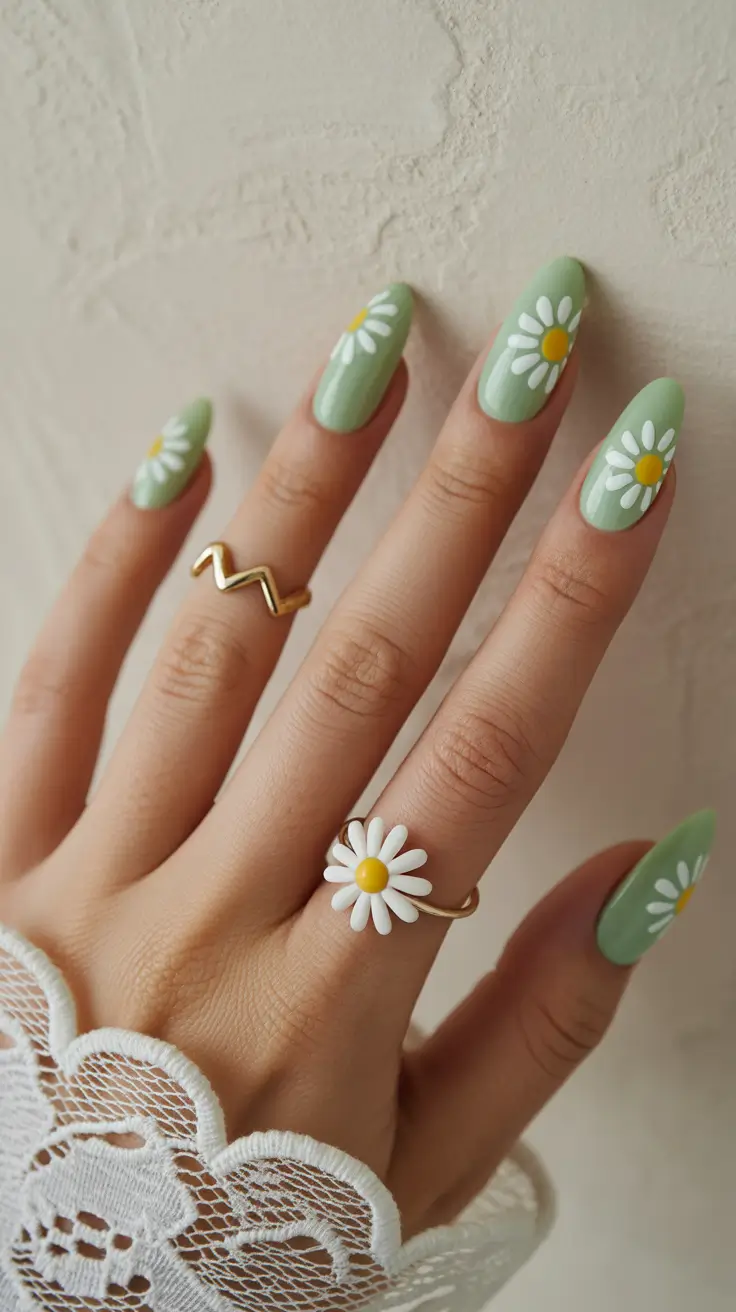
To bring this design to life, I typically pair a milky sage or Olive-pastel gel with white and yellow detail polishes. Dotting tools make the petals easy, especially when working in soft, imperfect strokes that keep the flowers feeling organic.
Painting daisies is one of the easiest floral techniques for beginners. Start with five or six small white lines, add a central yellow dot, and finish with a glossy topcoat. Celebrity nail artists often mention that florals look fresher when petals aren’t perfectly symmetrical – a tiny imperfection adds charm.
Whenever I wear floral designs, I feel like my hands are part of the season itself. It’s such a sweet, uplifting manicure that instantly brightens your mood.
Deep Forest Shine With Emerald Sparkle
This set blends intense, glossy Forest green with a shimmering accent that feels rich and dimensional. The glittered nail pulls in everything from micro sparkles to chunky flecks, creating a jewel-like Emerald glow. It’s dramatic without being overwhelming, a perfect mix for anyone who loves deeper Designs that still have movement and light. It leans more nighttime glam than daytime casual, but honestly – wear it whenever you feel bold.
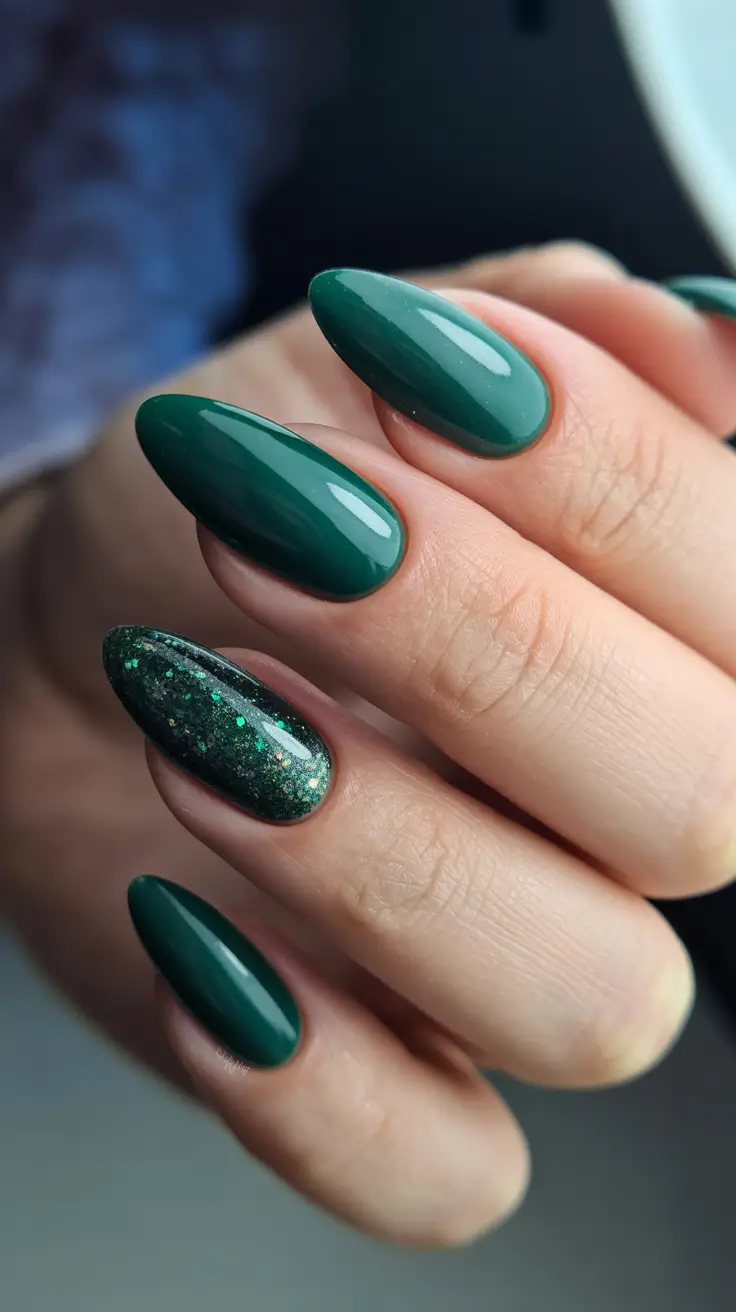
For materials, I like using a saturated dark green gel and a multi-dimensional glitter gel polish. Layering the glitter over a dark base enhances its depth, making it feel almost like galaxy marble but without the effort.
At home, I usually keep the accent nail for last so I can take my time building the glitter layers. A tip from editorial pros: cap the free edge of glitter nails very carefully, because textured polishes chip faster. I follow that religiously and it helps my glitter sets last much longer.
Wearing shades like this always makes me feel powerful. It’s moody, it’s elegant, and it gives that subtle glimmer when the light hits just right.
Gold Ribbon Swirls on Green and Nude
This final look in your batch merges glossy green, soft neutral, and gold glitter swirls into a design that feels both festive and sophisticated. The gold creates a ribbon-like movement across the nails, giving just enough sparkle without tipping into drama. If you’re craving green nails inspiration with hints of glamour, this is such a beautiful balance between refined and Funky. The combination of Light green, deep green, and gold makes it universally flattering.

I usually use two green tones – a deeper forest and a soft sage – plus a gold glitter liner. The nude base helps the swirl stand out while keeping the composition from feeling too busy. Almond shapes are perfect for this because they elongate the swirl naturally.
When I recreate designs like these, I sketch the swirl with a nearly dry brush first. It helps guide the final glitter line and keeps proportions natural. One pro trick I’ve seen from master techs is using flash-cure gel while drawing to “freeze” individual sections so they stay crisp.
There’s something special about the way this design catches light in motion. It feels elegant but artistic, the kind of manicure that quietly steals attention in the best way.
Neon Waves With a Matte Finish
This look brings pure summer energy – bold Neon green paired with soft wavy stripes that keep things playful without feeling overly busy. The matte finish gives the whole design a velvety edge, making the brightness feel stylish instead of overwhelming. I love how this set balances clean color with just enough Art to make it interesting. It’s a fun option for anyone who loves green nails inspiration that leans modern and confident.

A crisp neon gel polish is key here, especially one formulated to stay bright under a matte topcoat. For the waves, a thin liner brush helps create the gentle, flowing pattern. I usually work with two tones of green – one bright and one slightly lighter – to build contrast without adding more colors.
A matte manicure benefits from ultra-smooth prep. One trick I learned from a pro in LA: buff just a little more than usual and apply very thin coats. Matte topcoats can exaggerate texture, so the smoother the base, the better the finish.
This is one of those designs that makes your nails feel like a little summer accessory. Fresh, modern, and instantly eye-catching.
Lime Shine With Gemstone Gradient Accent
This set mixes juicy Lime green with a gradient accent nail anchored by tiny gemstones. The combination feels cheerful and polished at the same time, making it great for anyone who wants green nails with design that feels dressy but still wearable day to day. I especially love how the nude accent lets the green shimmer fade upward – it adds a softness to the overall brightness.

To create this look, you’ll want a glossy lime gel polish, a sheer nude base, and fine green shimmer powder for the gradient effect. Small crystals or rhinestones add dimension. I find that flat-backed stones adhere best when placed into uncured builder gel.
Blending the gradient is easy if you tap the pigment lightly along the edge of the nude base before sealing it. Many editorial artists recommend using a fluffy eyeshadow brush for this step – it gives a softer fade than a nail art brush.
Whenever I wear designs like this, I catch myself admiring the sparkle every time the light hits just right. It’s sweet, bright, and perfect for sunny weekends.
Light Green Iridescence With a Soft Glow
This manicure feels almost ethereal – a Light green iridescent finish that shifts gently with movement. The tone is subtle but special, perfect for anyone who wants green nails simple that still feel elevated. On shorter nails, this finish becomes even more chic, adding a hint of shimmer without drifting into bold territory. It’s one of those understated styles that quietly stands out.
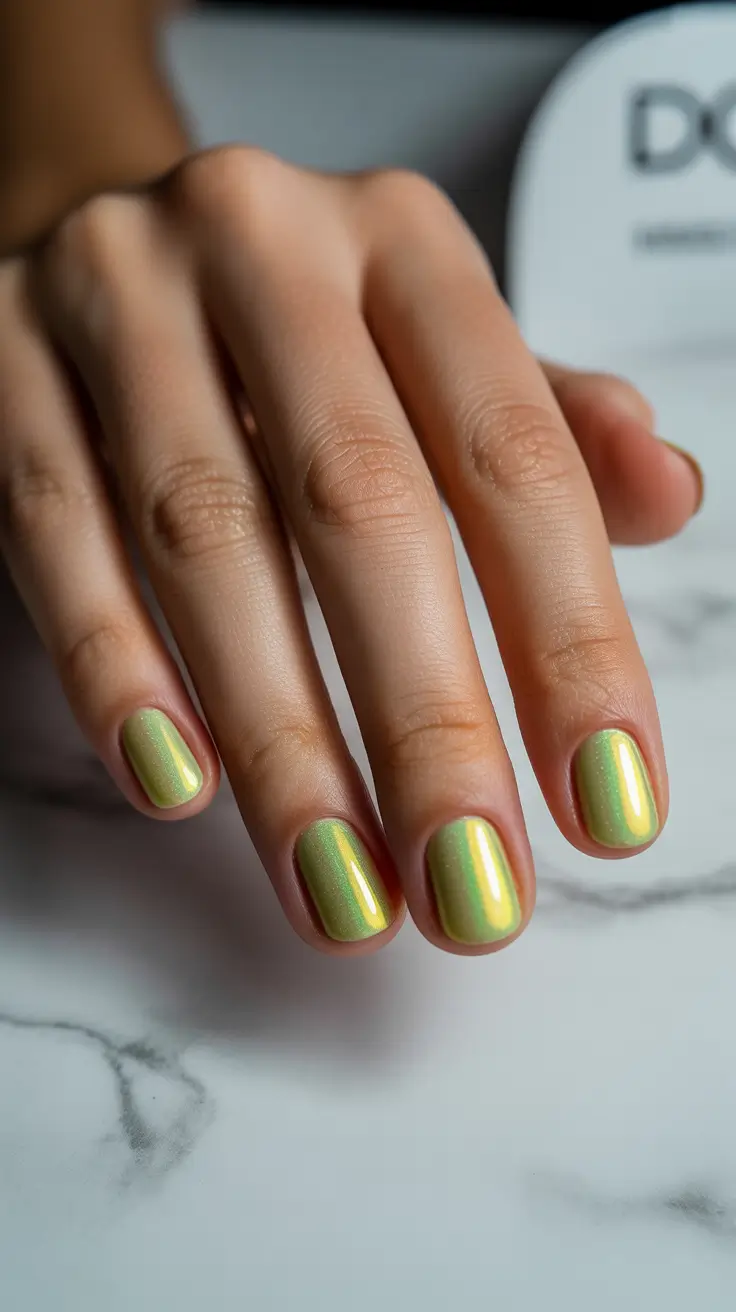
For this glow, I typically use a pearl or duochrome powder over a pale green base. Gel polishes with iridescent particles work beautifully too. A thin, even topcoat is important so the shimmer looks smooth rather than grainy.
A tip I once heard from a K-beauty nail artist is to apply duochrome powders while the base is warm from curing – it helps them adhere better and creates a smoother finish. I use that trick every time I want this kind of soft luminosity.
This look is perfect for days when you want something pretty but quiet. It feels fresh, airy, and timeless.
Dark Olive Metallic Glow
This version leans deeper, richer, and more dramatic – a metallic Dark olive that almost glows from within. It’s sleek and polished, with a slight shift that makes the nails look dimensional without needing extra Designs. This shade is gorgeous for fall, winter, or anytime you want green nails aesthetic with a moody twist.

Metallic polishes work best when applied in thin layers. I usually start with a deep olive base and then add one or two coats of a reflective shimmer polish. A glossy topcoat enhances the depth, making the green look almost molten.
One tip I rely on: use straight brush strokes from cuticle to tip to minimize streaks. Metallic formulas show everything, so slow, steady application is your friend. I picked this up from an editorial article years ago and still swear by it.
Every time I wear a shade like this, I feel a little bolder. It’s powerful without being loud – a quiet confidence wrapped in olive shimmer.
Neon French Almonds With Crystal Accents
This final look in your batch is all about playful elegance. A bright Neon green French tip curves across a soft nude base, finished with a simple crystal accent on each nail. It’s chic, modern, and perfect for anyone wanting green nails almond that balance drama with refinement. The shape alone already feels expressive, but the neon makes it even more fun.

To create this, I like using a sheer pink or beige base paired with a neon green gel for the tips. The almond shape helps the neon stretch naturally along the curve. A tiny silver crystal adds just enough sparkle without taking attention away from the color.
When painting French tips, I often use a bottle brush rather than a liner – turning the brush slightly sideways helps get a smoother arc. I learned this from a pro at a New York salon, and it’s changed my entire approach to French designs.
This style reminds me of warm afternoons and spontaneous plans – bright, clean, and effortlessly pretty.
Neon Capsule Tips With Bold Black Edges
This design brings a high-impact, almost futuristic feel – a vivid Neon green capsule shape framed by graphic Black and edges. It’s one of those styles that turns your nails into accessories all on their own. I love how the contrast makes the neon glow even brighter, giving the whole look an energetic, editorial vibe. If you’ve been craving green nails designs that feel daring and fashion-forward, this is exactly the kind of statement piece that 2026 is leaning into.
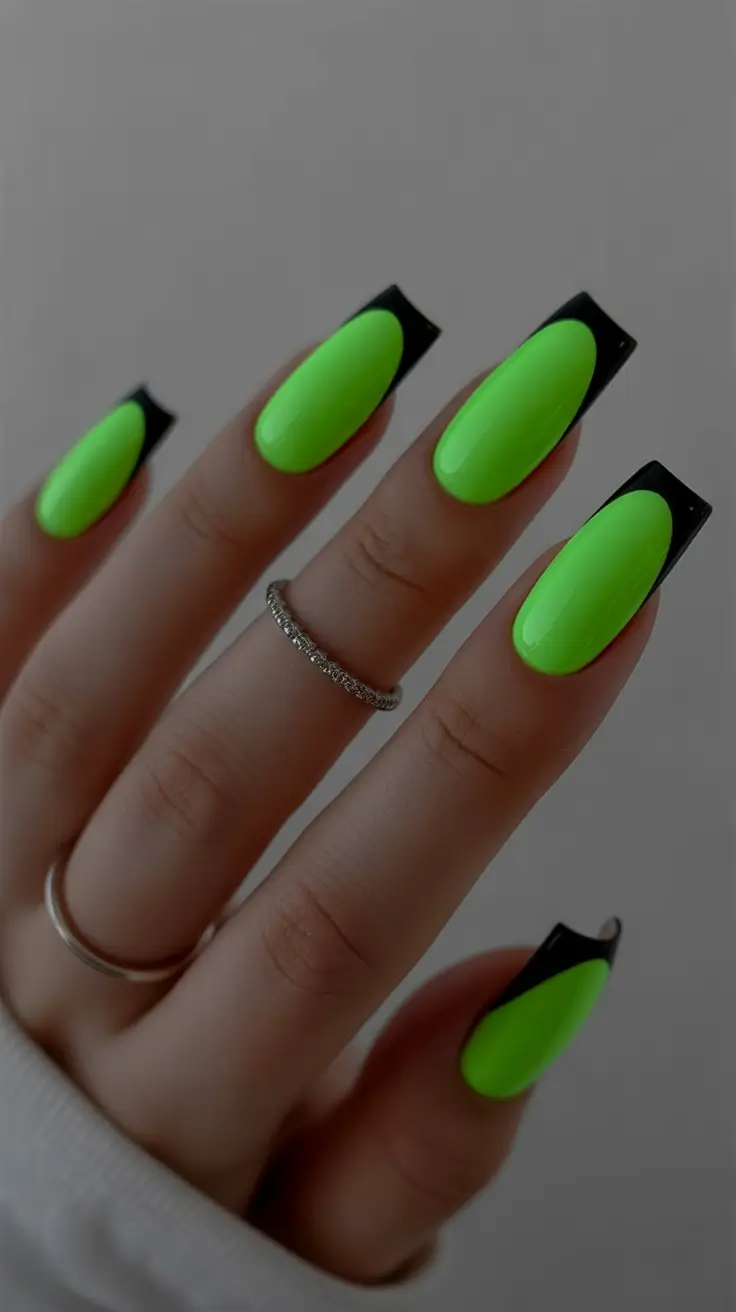
To create this sharp contrast, I usually start with a full neon green base coat using a gel polish that’s specifically made for bright saturation. Once cured, the black framing can be added with a liner brush or with nail stencils for cleaner edges. A glossy topcoat enhances the crispness of the lines while keeping the neon smooth.
A helpful professional tip I once heard from a New York tech: apply the darker shade last so you can adjust the symmetry of the framing more easily. This little shift gives you more control and avoids having to retouch the neon underneath.
Whenever I wear a look like this, I instantly feel more confident – bold nails somehow change my whole posture. It’s daring but polished, and surprisingly easy to pair with minimalist outfits for an effortless punch of color.
Soft Lime Block French With Crisp White Tips
This manicure blends a gentle Lime base with clean white square tips for a refreshing twist on the classic French. The combination feels modern, balanced, and incredibly wearable for everyday styling. I love how the white tips add structure while the lime keeps everything youthful and bright. It’s a beautiful choice for fans of green nails french tip who want something light but still playful – perfect for warm days when you want your nails to feel breezy and polished.
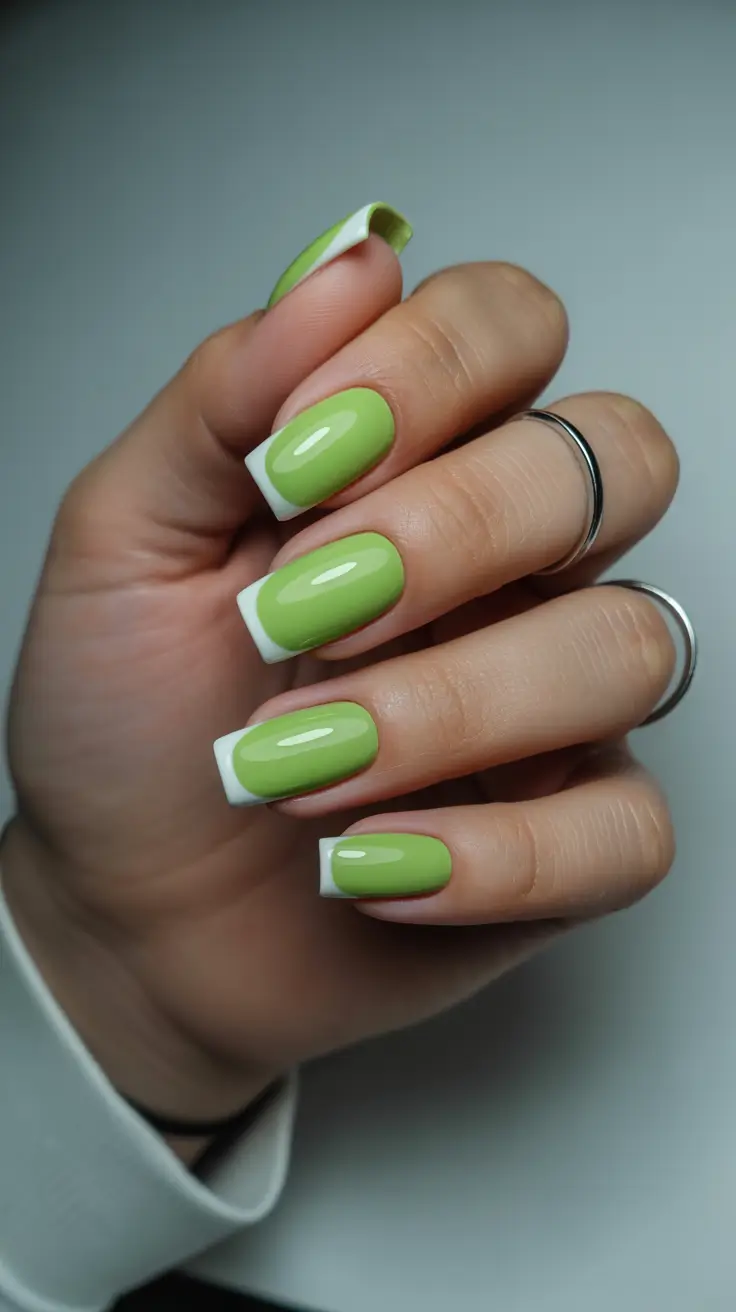
For materials, I typically use a soft lime crème gel and a crisp white for the tip detailing. Square or squoval shapes emphasize the block-style French best. Layering thinly is key here; lighter greens can streak if applied thick. A self-leveling formula helps create that smooth, glossy finish.
When doing block French tips at home, I like to flip the brush sideways for the white tip – it helps create sharp edges without relying on tape. Many pros mention the same technique because it keeps the transition line neat while still allowing freehand control.
This design always reminds me how refreshing a twist on a classic can be. It’s clean, modern, and just a touch youthful – the kind of manicure that works effortlessly from morning coffee to summer evenings out.